Adventure, baby!

Kids

Chi Chi’s Cafe: Kid-Friendly Cafes, Waterloo, Sydney

Sometimes at the end of a long and arduous week, all you want is to drown your sorrows in some comfort food. Chi Chi’s Café, in Waterloo, is just that: a kid-friendly place that offers no-fuss comfort food when you really need it.

Lukas waiting (sort of) patiently for his food. (Photo by Emily Staresina)

Although Danks Street is lined with cafes (more and more everyday it seems), few are open between that awkward time after lunch and before most people consider eating dinner. Feeling a little desperate for calories, Baby Lukas, my husband Lorin and I stumbled upon Chi Chi’s. It was relatively quiet and it looked like it was closing, but much to our delight, the host ushered us in and assured us all options were on the table. At 4:45pm in the afternoon. Total score.

Lorin decided right away on the beef burger with chips ($14.50) and Baby Lukas convinced me to share a cheese and tomato open melt ($8.50). While we waited for our food, the staff couldn’t have been more welcoming or friendly to Baby Lukas. In fact, Baby Lukas ended up behind the counter in the arms of a waitress, helping her ring in a few transactions.

Chi Chi's beef burger with Chips ($14.50). Photo by Emily Staresina.
Chi Chi’s beef burger with Chips ($14.50). 
Chi Chi's cheese and tomato open melt ($8.50). Photo by Emily Staresina
Chi Chi’s cheese and tomato open melt ($8.50). 

Our food came relatively quickly and it was good value: big, unpretentious portions with generous servings of side sauces at no extra charge. Such a relief to find this sort of place amongst all the trendy cafes in the neighbourhood.

Last Bite: the next time you’re craving some serious comfort food that’s good value and welcomes kids with open arms, check out Chi Chi’s Café.

Highchairs: Yes.
Stroller storage: Yes.
Easy access: Yes.
Change tables: No.
Kids’ menu: No, but kids won’t starve

Chi Chi’s Cafe
Shp 1a/ 207 Young St
Waterloo NSW 2017
Phone: (02) 9699 3510
Prices: $

Halloween in New York 2013

This year was the first year that Cheese was old enough to kind of “get” Halloween. She didn’t understand dressing up as someone or something, so I was still able to choose her outfit (yay!). A friend knew that Cheese was into Mickey and Minnie Mouse and passed on a Minnie Mouse dress that they didn’t need for their toddler.

It fit Cheese PERFECTLY. I definitely wouldn’t have thought of it as a costume idea myself (I’m more into a bit of a DIY/thrown-together-kinda-thing), so it was great for Cheese to try something really new. She’s not a “girlie” girl and happiest when unencumbered to run and climb, so it was so my great surprise that she LOVED the frilly Minnie Mouse dress.

She wore it for three days straight (with me washing it in between because she got it filthy every time she wore it), and every time she put the dress on she turned into a different kid. One who twirled and fluffed out her taffeta skirt. It. was. adorable. And, she’s been asking to wear dresses ever since.

It’s always tough to decide what to do for Halloween in Brooklyn as there are so many options. I decided on the DUMBO Under The Archway event because it looked to be a bit less crazy than some of the other options considering I was taking a little toddler. We stroller on down to DUMBO, stopping to collect candy from the stores on the way (kinda of a lazy-ass version of trick-or-treating …) and ended up under the Archway to join the festivities.

My personal fave was the Boothify photo booth. Cheese enjoyed running through it, photobombing everyone else. They also had music playing and a little fake Brooklyn bridge set up that the toddlers enjoyed dancing and running all over, and a free art station with Creatively Wild. We ran into some friends and Alec came home early to join us, making it a super fun afternoon for the toddlers AND for us.

Cheese had the best afternoon possibly of her life, without even eating any candy (oh, alright, she did get in a few licks of a lollypop). Can’t wait to do it all again next year!

Kiwi Crate Holiday Boxes + Giveaway

While this year isn’t the first holiday season for the toddlers, it is the first year that they are starting to understand what’s going on. This makes me super excited, because I LOVE holidays. I really love getting arty and crafty with Cheese, so trying out the holiday Kiwi Crate holiday boxes were the perfect way to get her involved in preparing for the biggest holiday in our year, Christmas. For our friends celebrating Hannukah, we asked our friends with a crafty toddler to test drive Kiwi Crate’s Handmade Hannukah.

Kiwi Crate boxes are so great for parents like us – people who like the IDEA of being crafty, but whose craft boxes contain little more than crayons, markers and stickers. If we want to make something special, we don’t have any of the right bits and pieces, and, to be honest, I would have no idea where to get things like a few pom poms and ribbon bits that each project requires. Kiwi Crates contain everything you need for the entire project – including things like glue and paint brushes. I LOVE the assumption that we have nothing to being with because, to be honest, we don’t! We have a TINY apartment and have no room for keeping bits and pieces of things in case we need them for crafting in the future.

All Kiwi Crate boxes are also generously stocked with supplies. More than you’ll need for each project, so you have spare materials to customise projects to your child’s preferences, plus have left over materials to make something else with next time.

The Kiwi Crate model is based on subscriptions, where you sign up for a new craft box to be delivered to you every month. They also offer single crates ($19.95 each), each one filled with enough materials for 2 – 3 projects, holiday crates and stocking stuffers.

Kiwi Crate Box One: Crafty Christmas Box, by Christine Knight

kiwi-crate-hanukkah

The box I was testing out was the Crafty Christmas box ($19.95). It includes materials to make three Swirly Ornaments (for hanging on the Christmas tree), a Gingerbread House and Paper Candies to decorate the house. The kit comes with a user guide for parents or older children, with very detailed instructions.

Gingerbread House

#Kiwi Crate #Christmas Box - via brunchwithmybaby.com

The Gingerbread House instructions had multiple options for house decorating ideas. Now, remember Cheese is only TWO. I had to give her a hand with a lot of the projects, like assembling the house and gingerbread man pieces. It was still a lot of fun for her, even though she couldn’t complete the projects on her own.

#Kiwi Crate #Christmas Box - via brunchwithmybaby.com

She was very interested in certain tasks, like sticking stickers on the roof of the gingerbread house, and especially pouring the paint into the ornaments. She wasn’t interested in anything that took too long, so I had to assemble everything in advance so it was ready for her to add her part or she’d wander off to play with something else. It was a really fun way for us to spend time together, and for me to explain to her what everything was and what it meant.

#Kiwi Crate #Christmas Box - via brunchwithmybaby.com

It was also great to let Cheese experiment with different materials that she wouldn’t usually play around with. She loved pasting the pom pom balls to the Gingerbread House and placing the sticker tiles on the roof.

#Kiwi Crate #Christmas Box - via brunchwithmybaby.com

Swirly Ornaments

#Kiwi Crate #Christmas Box - via brunchwithmybaby.com

The ornament kit was much easier to do with a two-year-old. I prepped the area and pieces and gave the ornament bases to Cheese to squeeze paint into. She really loved that she could squirt the squeezing the paint into the ornaments by herself, and enjoyed turning them to see the colors swirl together. This project was a bit messier (paint!), but also a lot easier for a smaller toddler to work on as there were a lot less steps involved.

#Kiwi Crate #Christmas Box - via brunchwithmybaby.com

After the paint squeezing and swirling, the project was pretty much finished. The ornaments were left to drain excess paint and then dry over night, and Mommy was needed to cork and tie them up, ready for hanging.

#Kiwi Crate #Christmas Box - via brunchwithmybaby.com

Both Cheese and I really enjoyed the craft projects. I’m not a super creative person when it comes to thinking up craft ideas, so I loved being given the framework and materials, and the freedom to decorate however Cheese saw fit. We will absolutely be ordering more of these boxes as Cheese gets older and can tell us what crafts she wants to do.

#Kiwi Crate #Christmas Box - via brunchwithmybaby.com

Kiwi Crate Box Two: Handmade Hannukah, by Dayna Brandoff of chaostheorynyc.com

#Kiwi Crate #Holiday Boxes + #Giveaway, via brunchwithmybaby.com

My daughter Tess (2 and 1/2 years old) and I made the menorah from the Handmade Hannukah box ($19.95) this morning. The box comes with candle holders (that look like slanted cups), tissue paper, paint and glue, plus a dreidel.

#Kiwi Crate #Holiday Boxes + #Giveaway, via brunchwithmybaby.com

The project got off to a great start. I showed her how to do one of the cups — thin layer of glue, then tissue paper, then more glue. She did every step pretty much on her own for the next cup. The next three cups, however, she really only wanted to be the glue painter — which was fine — that was two out of the three steps (although I definitely helped with the second round of glue-painting to make sure the tissue paper would really stick). I will say that the project was not able to hold her attention for nine cups worth of time, so decorating the last four was mainly Mommy’s job. We both had a ton of fun peeling the dried glitter glue off our hands afterward. And Tess was definitely proud of the finished product — and loves the special little battery operated candles. But convincing her to save the batteries until Chanukah? That’s sure to be a challenge.

#Kiwi Crate #Holiday Boxes + #Giveaway, via brunchwithmybaby.com

I also really liked that there’s plenty of tissue paper and mod podge left over to do a similar project on recycled jar . . . .I think we will probably make “vases” for the grandmothers for the holidays using the same technique!

GIVEAWAY

The generous folks at Kiwi Crate have offered Brunch With My Baby readers the opportunity to win a crate of their choosing. Enter via the Rafflecopter widget below.

Competition is open Wed November 6, 2013 EST to 11:59pm Tues Nov 12, 2013, EST.

Entry open to US mailing addresses only.

a Rafflecopter giveaway

Brunch With My Baby were sent product samples for reviewing purposes. All opinions are our own.


I’m Not The Fun Parent

I’m pretty fun, right? I mean, I like to have fun, and do fun things. And I’m funny! Well, in my own head, anyway.

Before having my toddler, I imagined how much FUN we would have together. I pictured it as a second childhood – playing with dolls, stickers, drawing, art projects, dance parties in the living room.

What’s become apparent of late is that I am not, in fact, a fun playmate for a toddler. I’m not silly, or goofy, and don’t think of playing monster games like mu husband does. My husband, it turns out, is the fun parent. He’s goofy and silly, he plays catch and chase, and roars like a bear, sending Cheese into fits of giggles. He is, in fact, not dissimilar to a toddler.

I’ve learned that I like to watch my child in play. I love seeing her eyes light up, her cheeky smile, her little head that is always a split second behind the rest of her body as she gallops along like a pony.

I enjoy watching her long eyelashes darken, her limbs lengthen, her hair grow into tight corkscrew curls.

I’m the parent who observes, documents, photographs. The one who makes sure she’s at school on time. That she has her hair tied out of her eyes, and is wearing weather-appropriate clothes. I’m the one who plans her meals, who gets her feet measured and takes her to the dentist. But I’m not the fun one.

I’m also the one who notices scrapes and bruises, who has Hello Kitty bandaids at the ready, who comforts and soothes and knows how to bring down a fever. I’m the one who finds new books that will teach about sharing and table manners, who finds puzzles at the right level to challenge her at each age, who can’t resist splurging on the cutest pair of tights for a hipster Brooklyn toddler. I’m the parent behind the scenes, but equal in the amount I love my child.

I cede any hopes of being “fun” to my husband for the time being. I hope that as she grows into a little girl with interests of her own that I can share in her world and enjoy the things she enjoys. I hope she’ll find me, if not “fun”, then loving, understanding and interesting. I hope I can teach her about the world, introduce her to new and amazing things, like how to take a great photograph, and help her navigate life as she grows and grows and grows.

Taste Buds Kitchen Cupcake Kids Class

Taste Buds Kitchen: #Cupcake Making Class For #Kids via brunchwithmybaby.com

Cheese is really into “helping” me in the kitchen these days. She likes to “help” spread Vegemite on toast, “cut” vegetables and “crack” eggs in a bowl. She’s been so interested in food preparation lately that I thought I would give a Cupcake Kids class at Taste Buds Kitchen a go.

The class theme for this week was Pinkalicious (the theme changes every week), based on the bestselling kid’s book series of the same name. A cute table is set up for 10 kids and their parents, ages two to six, with all the ingredients laid out, ready for mixing. Cheese was the youngest kid in the class that day by a fair amount (she turned two in August). The kids were on average, ages four to six.

Taste Buds Kitchen: #Cupcake Making Class For #Kids via brunchwithmybaby.com

The above photo pretty much encapsulates how the class went. Cheese was thoroughly enjoying trying all the ingredients. She followed the simple directions, like which ingredient to put in the bowl, but mixing was a bit hard for her to really get right (time to step in, Mama!).

Taste Buds Kitchen: #Cupcake Making Class For #Kids via brunchwithmybaby.com

I’ve always loved baking, since I was a kid too, actually. I’ve been wondering how to introduce baking to Cheese, so this class was not just fun for her, it was also educational for me to see how I can teach my toddler how to bake. I have to admit, I thought the class was just cupcake decorating. If I’d known it was baking from scratch I might not have been so game to bring her, as it’s definitely not something I would have thought she’d be into and for which she would be able to sit through a class.

Taste Buds Kitchen: #Cupcake Making Class For #Kids via brunchwithmybaby.com

After mixing through the ingredients, it was time to spoon the mixture into cupcake pans and have them placed in the oven to cook. Notice how they’re all pink?

Taste Buds Kitchen: #Cupcake Making Class For #Kids via brunchwithmybaby.com

While the cupcakes were baking, Chef Maggie read Pinkalicious (which I’d never read before, so it was fun for me too, ha!), while the kids listened and colored in a special Pinkalicious-themed coloring sheet.

Taste Buds Kitchen: #Cupcake Making Class For #Kids via brunchwithmybaby.com

Cheese was really into the book. A few months ago, this would have been a disaster (Read: toddler running ALL OVER THE ROOM) but since she started preschool last month, her concentration has definitely improved. She was up and down a few times to wash her hands again and get some food to eat, but over all she was really into the activity.

Taste Buds Kitchen: #Cupcake Making Class For #Kids via brunchwithmybaby.com

After the story came the frosting. The cupcakes hadn’t quite finished baking, so we frosted some previously prepared cupcakes while the others were still baking. After a quick lesson in the right way to frost, it was over to the kids, or in my case toddler, to let them do their stickiest. Cheese was in heaven. Didn’t want me to help (of course), so her cupcake looked kind of . . .  like a toddler decorated it 🙂 She really enjoyed picking up hearts and pink sugar and sprinkling them on top (and tasting a few).

Taste Buds Kitchen: #Cupcake Making Class For #Kids via brunchwithmybaby.com

We were given a sweet little container to place one of our decorated cupcakes in to take home, while we enjoyed eating the other cupcake right then and there (of course).

Taste Buds Kitchen: #Cupcake Making Class For #Kids via brunchwithmybaby.com

Taste Buds Kitchen: #Cupcake Making Class For #Kids via brunchwithmybaby.com

Cheese really enjoyed the class (she was going on about the “cake cakes” all the way home), and it was a fun activity for us to do together. I think she was a little young for the class, but not by much. I would definitely take her again when she’s a little older — probably in winter when I’m desperate for ways to entertain us both. As with a lot of things that I get stressed over (for nothing), Cheese proved me wrong in her ability to handle her first baking experience. Even though her attention span did wane at times, the class was a success for the both of us.

Taste Buds Kitchen
109 W 27th St
212-242-2248
Cupcake Kids is held every Saturday morning at 9am. Classes cost $45 per child.

Brunch With My Baby attended as a guest of Taste Buds Kitchen. All opinions are our own. We happen to love, love, love cupcakes.

petiteParade and Stride Rite at NY Fashion Week

The kind folks at Stride Rite invited me to attend their show at the petiteParade, the junior branch of NY Fashion Week. From my first row seat (wooo!!) I watched two parades – the showcase featuring collections by Andy & Evan, Floatimimi, Oil & Water, Stella Cove, SUOAK and Sweet Lola, and then the Stride Rite Children’s Group runway showcase.

The hosts of the showcases were twins Tristin and Tyler – two very sassy kids with their own website about their adventures in the big city.

It was impressive seeing little kids confident strutting their way up and down the runway, showing (for the most part) no hesitation at the wall of cameras at the end.

The Stride Rite Children’s Group runway showcase was a sneak peek at their Spring 2014 collection – full of floral accents and pops of bright color.

Flowers in the hair, spring sandals on the feet.

Denim, flowers and pretty sandals.

Superheros! Love this nod to Kill Bill.

I really enjoyed the show, seeing these gorgeous children modelling trends for next spring. I’m a big fan of Stride Rite shoes (Cheese has basically worn them since she started walking), so it was really fun seeing the spring line before it hits stores (and also before winter hits – I’m totally in denial).

Oscar de la Renta for Kids Trunk Show

I was excited to receive an invite to a trunk show for Oscar de la Renta for kids, hosted by Rosie Pope.

The clothes were just gorgeous – super pretty dresses and outfits, with delicate lace and beautiful floral prints.

Snacks! Love some sweets to eat while perusing lolly-coloured clothing.

Lots of floaty, fluffy dresses in pretty pastel and vibrant hues.

This dress was a favourite – the hand stitched lace was just exquisite.

I splurged and ordered this dress for Cheese. I thought it would suit her personality – easy to wear, super soft fabric, bright print that will compliment her bright blue eyes. Um, spoiled much??

I really loved Rosie’s diaper bag range, particularly this bag – I’d totally use it as a regular bag!

STOKKE Scoot Review and GIVEAWAY

#STOKKEBABY #Scoot #stroller review and #giveaway! brunchwithmybaby.com

I’ve been known to own a few strollers (four — not all at once — to be exact). But the hunt for the perfect stroller is eternal, especially as one’s needs change with the different ages and stages of a child’s (and your) life. When I bought my main stroller, before Cheese was born, I really didn’t consider my living situation well. Third-floor walk-up, with nowhere at the bottom of the stairs to store a stroller. I bought a stroller that was super heavy  (too heave for me to carry down stairs) and that needed the bassinet or seat removed before the bottom part was folded. Really, this stroller was suited to someone living in an elevator building, and so I didn’t actually use the stroller much after a few aborted attempts where I kicked my shin on the bottom bar, until we finally did move into an elevator building a year later.

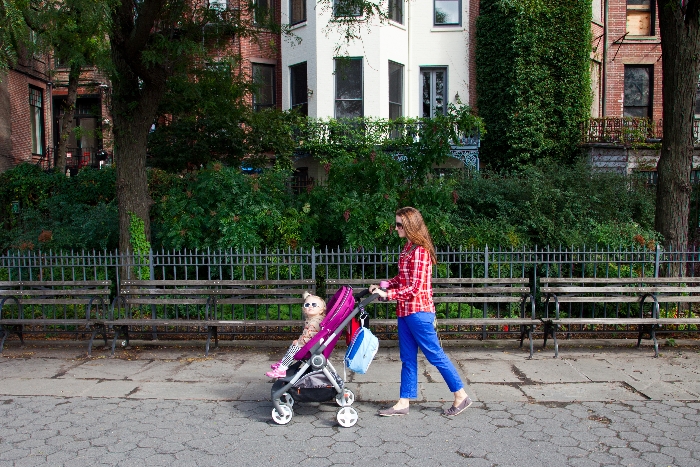
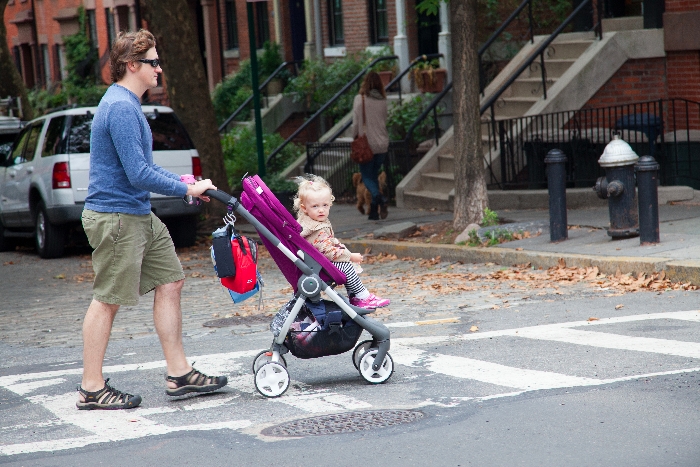
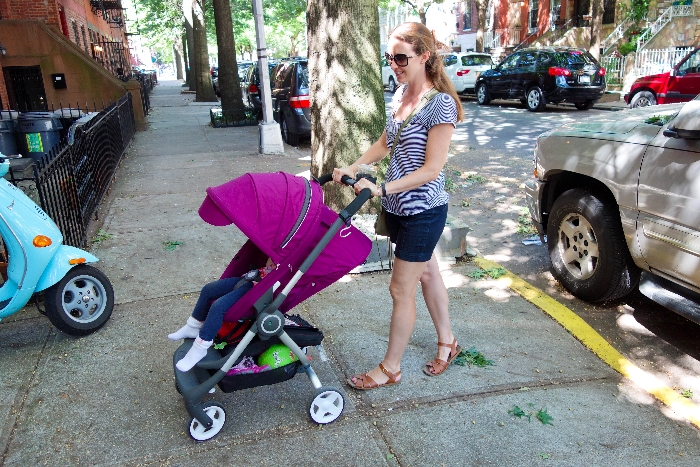
We are huge fans of STOKKE in our home, with Cheese’s nursery filled with the Sleepi bed and Care: Change Table, and the Tripp Trapp highchair in the living room. STOKKE is known for their innovative designs and well-made pieces, so I was excited to check out the STOKKE Scoot. It has all the features that make is suitable for urban parents like myself. Check out my husband’s and my road test of the STOKKE Scoot around our home ‘hood in Brooklyn.

#STOKKEBABY #Scoot #stroller review and #giveaway! brunchwithmybaby.com

#Stokke #scoot review and #giveaway burunchwithmybaby.comThe Fold
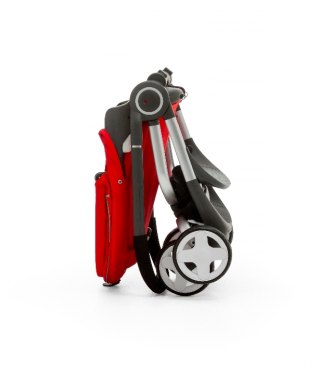
The STOKKE Scoot comes all in one piece, so you don’t need to remove anything to fold it (except anything you may have stored in the basket underneath). It’s a bit tricky to master at first, as you have to follow a few steps before you can fold it: first, retract the handlebar. Then, fold it by doing the following: lift the bottom portion of the seat, push the seat backwards, then push the button on the wheel axle and pull it up to collapse the stroller into one slim piece. I know it sounds complicated (then again, try to express in words how to fold any stroller on the market these days and you’ll have a similar list), but once you get the hang of it, it’s fast and easy. Remove the cup holder from the handlebar and it balances on its side for easy storage in a small NYC apartment like mine.

#STOKKEBABY #Scoot #stroller review and #giveaway! brunchwithmybaby.com

Collapses In One Piece
One of the biggest things that I love about this stroller is that it collapses into a sleek and thin silhouette — in just one piece. Living in NYC, this is an essential for making life easier for parents. It means being able to call a car to get home if you find yourself in torrential rain (been there!!) and easily throw the whole stroller in the back without having to first remove the seat of the stroller and then having to fold the body of the stroller. It also means you can go out to any restaurant without needing to check if you need to bring an umbrella stroller or carrier instead of the SUV-stroller, because when folded up, the Stokke takes up little real estate. Since we love to eat out, this feature alone was like hitting the holy stroller grail.
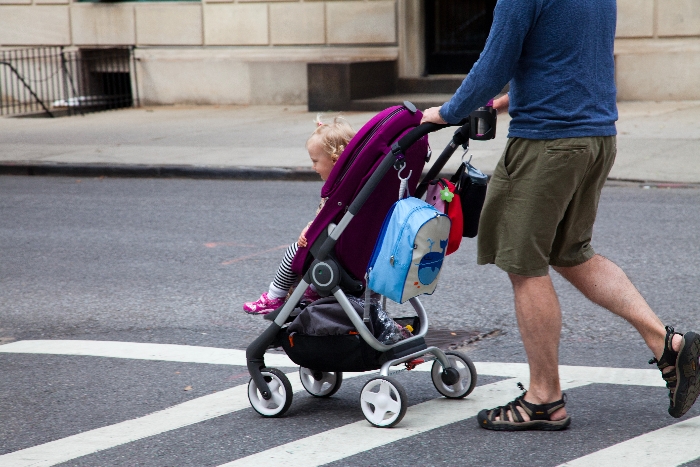
#STOKKEBABY #Scoot #stroller review and #giveaway! brunchwithmybaby.com

Storage Space
It’s a truth universally acknowledged that you can never have enough storage space in your stroller basket (or anywhere, for that matter). There is a huge basket underneath the STOKKE Scoot, with plenty of room for groceries, or a huge diaper bag and sand pit toys. The stroller sits quite high, so there is a lot of vertical space as well, and it’s all easily accessible from every side. The only improvement I’d like is for the back of the basket to sit a bit higher so it keeps items in even better. When you tilt the stroller to go over things like steps or curbs, items can fall out if not well-secured.

#STOKKEBABY #Scoot #stroller review and #giveaway! brunchwithmybaby.com

Weight
It’s a hefty stroller, weighing in at 26 pounds. It can accommodate kids from birth (with the STOKKE Scoot Softbag) to 50 pounds — making it a great long-term investment. It’s also a very sturdy, well-made stroller, but doesn’t feel heavy to push. It’s also tall rather than wide, giving it less of a footprint (which is valuable when you need to take it on the subway or park it in a small corridor or apartment).

#STOKKEBABY #Scoot #stroller review and #giveaway! brunchwithmybaby.com

The Ride 
The Scoot features four-wheel suspension, so it’s a smooth ride for Baby, even over Brooklyn cobblestones. The handlebar is adjustable, which is great for changing the height when my husband (who is 6′) takes over the driving from me (I’m 5’7). It’s comfortable to push around for a long period of time, and is easy to steer, even with one hand (not that I’m texting while driving, or anything).
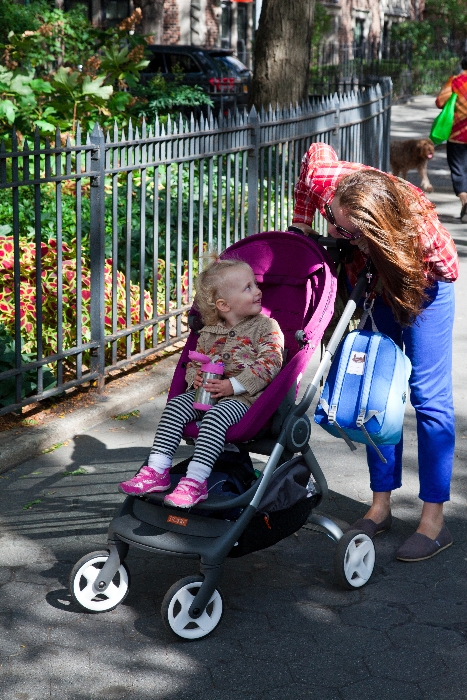
#STOKKEBABY #Scoot #stroller review and #giveaway! brunchwithmybaby.com

Recline
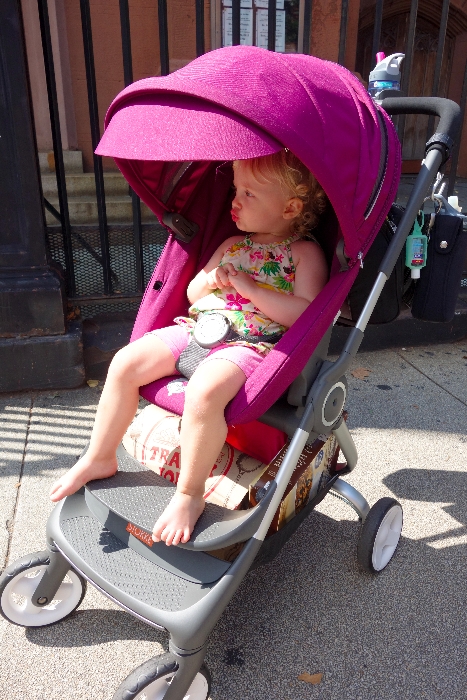
The Scoot features a full recline, that you engage by unclipping a clip on each side of the back of the canopy. It features four recline-to-upright positions: facing you, upright or reclined, and facing away from you, upright or reclined. There is only reclining position — all the way back. It would also be great if there was one button or clip you could use to recline the stroller so it could be done smoothly with one hand, but I didn’t find it as awkward as I expected it to be when I used it, and Cheese had a really good nap in her little cocoon.

#STOKKEBABY #Scoot #stroller review and #giveaway! brunchwithmybaby.com

Canopy
It has a decent canopy, with a cute little visor that flips out (and zips off if needed), which, when tilted downwards, provides that extra bit of sun protection for your kid’s legs. There is a zippered section in the canopy that, when open, lets air circulate better on a hot day, and lets you take a peek at what your kid is doing in there (or, in my case, making sure important apps aren’t being deleted off my iPhone).
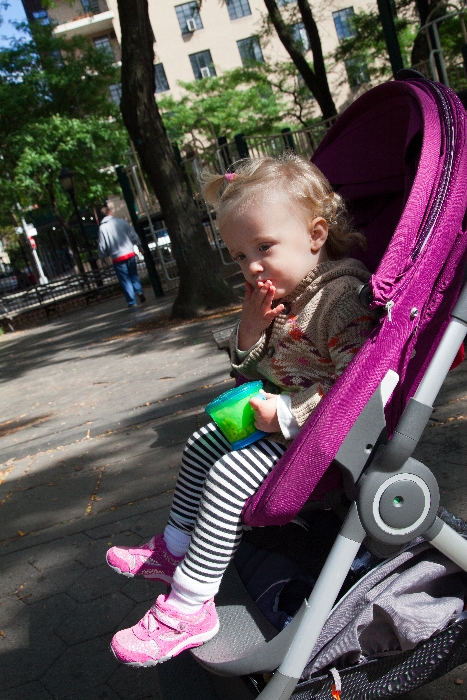
#STOKKEBABY #Scoot #stroller review and #giveaway! brunchwithmybaby.com

Adjustable Footrest
I love that I can adjust the footrest to my toddler’s feet so they’re not dangling down. And SHE loves that she can climb up and into it all by herself. What a fun, new game!

#STOKKEBABY #Scoot #stroller review and #giveaway! brunchwithmybaby.com

Accessories
The Scoot comes with a rain cover, mosquito net and cup holder. You can order car seat adaptors ($79.95) for Maxi Cosi and Peg Perego car seats. There is no bassinet with this stroller – but, to be honest, since I never used the bassinet for my toddler when she was a baby, I wouldn’t let this deter me from buying. You could absolutely use it from newborn age by clipping in the car seat for the first few months.

The STOKKE Scoot retails for $599.99 and comes in a range of colors (brown, red, dark navy, purple, beige and black melange).

#STOKKEBABY #Scoot #stroller review and #giveaway! brunchwithmybaby.com

GIVEAWAY

The very kind people at STOKKE are giving Brunch With My Baby readers the chance to win one STOKKE Scoot in the color of her choice. Enter using the Rafflecopter widget below.

The competition opens Wed, Oct 2 to 11:59pm Tue Oct 8, 2013.

Entry open US mailing addresses only.

a Rafflecopter giveaway

We were sent a product sample to aid us with this review. All opinions are our own.

Eloise Starts School

Starting school - photography tradition


Today was my little Cheese’s first day of “school”. And by school, I mean her 2s programs, which are nursery schools (she’s doing two programs – each one two days a week for a few hours at a time).

I wasn’t sure how she’d go at her first class today – I was pretty confident she would be fine, but you never know till it’s time to let go. The first of her two programs is where she has attended other classes with me since she was six months old, so she knew the space and teachers already.

At the gate, she was a bit confused as to what was happening, with so many adults and kids all stampeding in – I put her down, pointed out the teachers she knew, and off she went, without looking back. My big girl.

I was able to spy on her during one period of the session (we were asked to stay onsite for their first session), and it was a joy to see Cheese running and playing and interacting with the teachers and kids, happy and at ease. At the end of class she came running to me with her artwork, telling me about her day (“Moooo” – there was a cow puppet –  and “YYYYY” – the letter she learned).

Even though her 2s programs aren’t “real” school, it feels like a big step we’ve taken today – from here on in, little Cheese is going to be in school. I feel so proud of her for how outgoing she was today. Myself, I am feeling super emotional about this big first step my little girl has taken towards developing her own, beautiful life.

Brunch Survival Guide: Rockaway Beach Day Trip

Rockaways Day Trip Guide via brunchwithmybaby.com

Being from the land of beaches, I’ve found myself desperately missing white sand and blue waves – yet I feel trapped at home because of the timing of Cheese’s naps. Today, however, we decided to throw caution (and naps!) to the wind and catch the A train to Rockaway for a day at the beach.

Rockaways Day Trip Guide via brunchwithmybaby.com

Getting there by train was a lot easier than I’d expected. We caught the A to Broad Channel, then switched to the S (Shuttle) to 90th St. The whole trip took 50 minutes from our apartment in Brooklyn. After getting off the train, it was a 10 minute walk to the beach.

The Rockaways were hit extremely hard during 2012’s Hurricane Sandy. You can still see the extensive damage as you walk to the beach – the houses with ground floor construction still being done, the buildings missing shingles on their walls, parts of the boardwalk still being rebuilt. The beach has undergone a massive reconstruction since the hurricane and it is pretty amazing that the beaches were able to reopen again this summer.  The boardwalk is still in the process of being re-constructed, and sections of the beach are closed off, but don’t let that stop you. There are still 14 miles of white beach for you and your kids to enjoy.

The beach in Rockaway is particularly kid-friendly. The water is calm and shallow at the shoreline, and several newly-reopened playgrounds line the boardwalk.

Rockaway Taco: Rockaways Day Trip Guide via brunchwithmybaby.com
Rockaway Taco
First stop is breakfast, after surviving the train trip intact. Everyone we asked recommended Rockaway Tacos, a tiny little taco stand tucked away on 96th street. Breakfast is served 9am-10:45am, then the regular menu from 11am onwards. You won’t be the only taco-seeker, so be prepared for a long wait. Their side garden features benches to sit on in the shade, and cool murals to point out to the older kids. Grab a coffee or smoothie from the coffee and juice stand, Veggie Island, next door, then come back for your tacos. Tacos start from $3.50 each. Go for the fried fish taco – it’s a lightly fried piece of white fish, topped with cabbage and crema in true Mexican style. They also do a nice Elote (corn on the cob smothered in mayo and spices, $3.50).

Rockaways Taco: Rockaways Day Trip Guide via brunchwithmybaby.com

Rockaways Taco: Rockaways Day Trip Guide via brunchwithmybaby.com

Rockaway Taco
95-19 Rockaway Beach Boulevard

Rockaway Beach, NY
Phone: (347) 213-7466)
Prices: $$
Hours: Mon-Wed 11am-8pm, Thur-Sun 9am-8pm

Veggie Island: kid-friendly cafes, Rockaways Day Trip Guide, via brunchwithmybaby.com

Veggie Island
Next door to the famous tacos sits the aforementioned Veggie Island – home of great coffee, smoothies and snacks like the peach muffin ($3) I sampled. You can also grab some brightly-colored fresh fruit and veggies. I also picked up a Strawberry and Banana Smoothie ($6). It was more like a slushie than a smoothie (blended with ice rather than yoghurt or milk), which was great for the hot day.

Veggie Island: kid-friendly cafes, Rockaways Day Trip Guide, via brunchwithmybaby.com

Veggie Island: kid-friendly cafes, Rockaways Day Trip Guide, via brunchwithmybaby.com

Indoor seating is limited to bar stools, so take your smoothie and coffee to go.

Veggie Island
95-19 Rockaway Beach Blvd (on 95th St.)
Far Rockaway, NY 11693
Phone:(347) 277-2268
Prices: $$

Rippers: Rockaways Day Trip Guide via brunchwithmybaby.com

Rippers
Rippers is currently the only concession stand open on the boardwalk. You’ll find breakfast burritos, hamburgers and fries – good, solid beach food. They also have a large, shaded seating area and phone charging station, and are located next to the brand new bathrooms installed on the boardwalk.

Ripper': Rockaways Day Trip Guide via brunchwithmybaby.com

Rippers
Rockaway Boardwalk
Beach 86th Street
Far Rockaway, NY 11693

Roberta's concession stand, Rockaways Day Trip Guide via brunchwithmybaby.com

Roberta’s
Walking along the street to get Cheese to nap in the stroller, I spotted this sign (above), which made my heart jump. Yes, it was the pizzeria I never venture to because I hate, hate waiting.

Roberta's concession stand, Rockaways Day Trip Guide via brunchwithmybaby.com

The Roberta’s pop-up stand features a wood-fire oven on wheels (genius!), delivering some seriously tasty pies. Each pizza is a single serve, with a basic Margarita costing $6. The pizza took over half an hour to arrive (at least that was better than waiting in line for a seat at a restaurant), but it was absolutely worth it (and better than waiting for over an hour on a line alone). Crispy base, with a soft crusty edge, the perfect savoury tomato sauce and daubs of mozzarella cheese on top. O.M.G. My only regret was not ordering two as Cheese ate a big chunk of mine.

Roberta's pizza, Rockaways Day Trip Guide via brunchwithmybaby.com

There are a few tables and benches near Roberta’s, but no shade. One option is to take it to the nearby toddler playground to eat on a bench there while your kids run in the sprinklers.

Roberta’s
Beach 69th Street
Rockaway Beach, NY 11693
Prices $$
Hours: Fri 12:30pm-6:30pm, Sat-Sun 11:30am-6:30pm

What you need to know before you go

  • Swimming is permitted only when life guards are on duty, which is from Memorial Day weekend until Labor Day weekend, daily from 10-6 p.m.
  • Avoid areas with red flags or “beach closed” signs. Temporary “islands” have been built at sections where the boardwalk is still damaged.
  • If you need chairs & umbrellas, there are stores at 116 Beach Street (near the subway) that sell them relatively inexpensively (there are no places to rent them).
  • LABOR DAY UPDATE: The stretch from Beach 110th Street to Beach 130th Street, and Beach 88th Street to Beach 93rd Street, will be closed over the long weekend for dredging.

Getting there

  • Take the A train to Far Rockaway, change at Broad Channel to the S train to 90th st. Travel time from Manhattan is about an hour and 15 minutes.
  • Rockabus has weekend buses from Brooklyn and the Lower East Side.
  • A weekend ferry runs between Pier 11 on Wall Street and Jacob Riis Park.